Step 2 - configure map
Click here to download the complete files for all steps in this tutorial.
The customer data in this tutorial’s input data.xlsx spreadsheet file is already geocoded – there is already a longitude and latitude associated to each customer. Geocoded data can be viewed directly on the map.
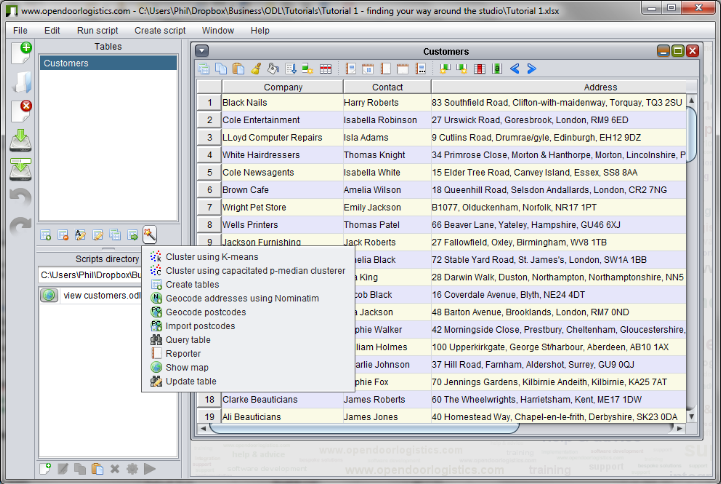
Ensure the Customers table is selected in the tables list and press the component wizard button in the tables toolbar (see earlier screenshot marking this button). A pop-up menu should appear as follows:
Select the Show map option. If you already have a show map script within your current scripts directory, you will see a dialog pop-up giving you the option to either run the pre-existing script or launch the show map wizard to create a new script. If this happens then select the show map wizard option to create a new script.
The script dialog to configure show map’s data adapter will then appear:
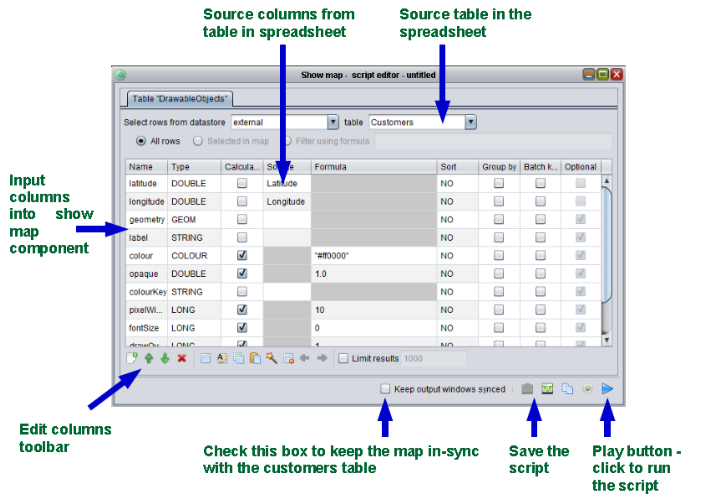
This dialog shows how the data input into the show map component is defined. The first column in the grid contains the name of the input field into the show map component (i.e. the destination field). The calculated, source and formula columns define how this field is populated. A field can be populated by either (a) directly copying it from the source table (in our case, the Customers table) or (b) calculating it using a formula. To copy the field directly you just have to select it under the Source column using the drop-down menu which appears. To use a formula you should check the Calculated checkbox and then enter the formula into the formula cell.
Tip - if you cannot see all the information in the grid clearly because the dialog is too small, resize the dialog by left-clicking on an edge and then dragging with your mouse.
As our Customers table contains latitude and longitude columns and the show map component takes latitude and longitude columns, these source and destination fields have already been matched up by the wizard. You can see this in the data adapter’s grid - the words latitude and longitude are repeated twice - both under name and under source. These are the only two columns that must be defined to show customer points.
Tick the box at the bottom called keep output windows synced to ensure any changes in the Customers table are immediately reflected in the map. This option should only be used for components which run quickly - using it for a slow running component can make the user interface slow and unresponsive.
Now press the save as button on the bottom right of the dialog (see the screenshot) to save this configuration. After pressing save as, choose a filename and the configuration will then be saved as an .odlx script file. If you save the script to the current scripts directory, a link to it will appear in the scripts panel on the bottom left side of the application. You can use this link to re-run the script whenever you want, without having to configure the data adapter again.
Tip – the .odlx script files developed in each tutorial are available in the tutorial’s zip file.
After saving, press the play button on the bottom right of the dialog (see previous screenshot). The play button looks like:

Tip – if you’re uncertain what a button does, move the mouse on top of it and a tooltip will appear explaining its function.
After pressing play the script will run and the map should appear with the customers, as follows:
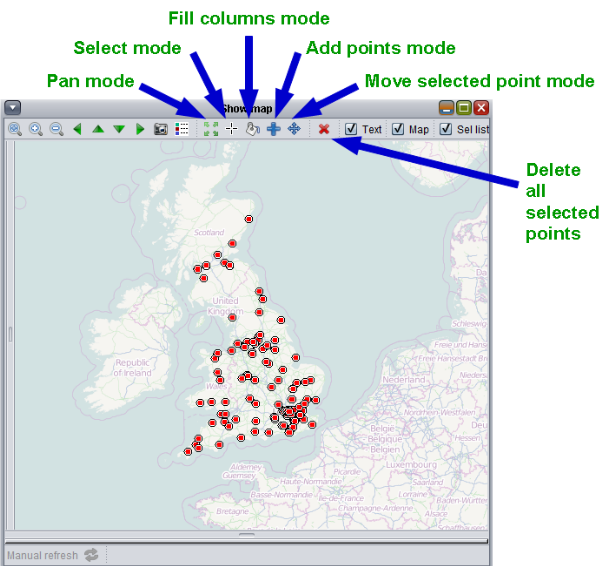
You can navigate around the map by dragging with your mouse, or using the cursor keys (left, right, up and down) on your keyboard. The mouse wheel will zoom in and out of the map. Navigation buttons are also available on the toolbar at the top of the map control.
Tip – let the mouse hover over an object to see a tooltip with its information (i.e. column values).